Development#
Introduction to GitHub Repositories#
GitHub plays a pivotal role in software development projects, providing a robust platform for version control and collaboration. Setting up a GitHub repository is the first step in managing your project’s codebase effectively. For a detailed guide on creating a repository, visit GitHub’s documentation.
Key Considerations for Repository Setup#
README File#
A well-documented README is essential for any project. It should outline:
Project overview and objectives.
Instructions for setting up, using, or contributing to the project.
Directory structure, especially for projects with complex architectures.
Contact information for the development team and project stakeholders.
Consider creating additional READMEs for different project components (e.g., frontend and backend) to provide specific setup or usage instructions.
Licensing#
For public repositories, selecting an appropriate license is crucial to define how others can use, modify, or contribute to your project. GitHub offers a comprehensive guide on licensing to help you choose the right license.
Branch Protection#
Protecting critical branches prevents accidental alterations or deletions. GitHub allows for branch protection settings, including requiring pull request reviews, status checks before merging, and prohibiting force pushes. Learn how to implement branch protection via GitHub’s guidelines.
Integrations and Notifications#
GitHub integrations enhance workflow efficiency. For instance, the GitHub bot for Slack sends notifications about pull requests directly to Slack. Discord also supports GitHub notifications through webhooks, as outlined in this guide.
Emphasising Code Reviews#
Code reviews are vital for maintaining code quality and identifying issues early. They can be facilitated through pair programming or pull requests.
Implementing Pull Requests#
Pull requests (PRs) are central to reviewing code changes in a collaborative environment. They allow team members to propose changes, which can be reviewed and discussed before merging into the main codebase. When submitting a PR, include detailed descriptions of the changes and the rationale behind them to aid the review process.
Benefits of Pull Requests#
Ensures code quality through peer reviews.
Facilitates early detection of errors or bugs.
Enhances team knowledge and understanding of the codebase.
Pull Request Templates#
Using templates for pull requests standardises submissions, ensuring they contain all necessary information for reviewers. Templates can prompt for specific details, such as the purpose of the change, tests performed, and any relevant screenshots. Here’s an example template to get started.
Understanding Git Workflows#
Choosing the right Git workflow is crucial for project organisation and efficiency.
Feature Branch Workflow#
This approach involves creating a new branch for each feature. After a feature is completed, the branch is merged back into the main branch. It keeps the development process organised and isolates changes until they are ready to be integrated.
Gitflow#
Gitflow extends the feature branch model with designated roles for different branches. It uses a develop branch for integrating feature branches before they are ready to be merged into the main branch, facilitating more structured and scheduled releases.
Trunk Based Development#
Trunk based development focuses on short-lived branches merged frequently into the main branch. This method minimises code divergence and integration challenges, promoting more continuous integration practices.
Managing Software Releases#
Releases mark significant milestones and improvements in your project. GitHub tags can be used to denote specific versions or releases, providing a snapshot of the code at that point in time.
Release Notes#
Good release notes succinctly communicate the changes, improvements, or fixes in each release, aiding users in understanding the benefits of updating to the latest version.
Creating a Release#
GitHub facilitates release creation with options to associate tags and detailed release notes, enhancing the visibility and accessibility of new versions. For a step-by-step guide on creating releases, refer to GitHub’s tutorial.
Leveraging GitHub for software engineering projects enhances collaboration, code quality, and project management. By following best practices for repository setup, code reviews, Git workflows, and release management, teams
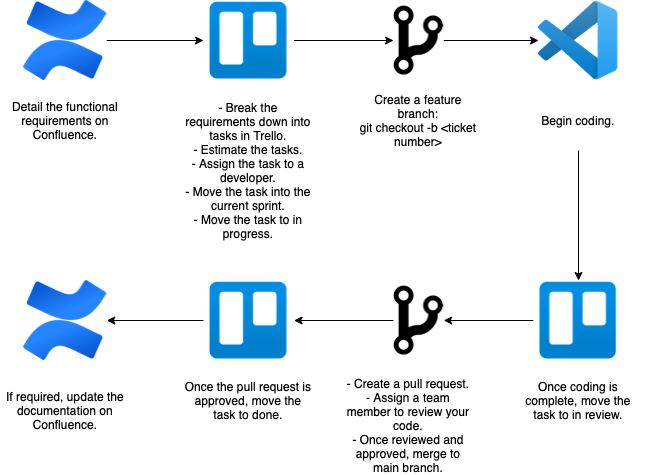
A Simplified Workflow#
For those unfamiliar with everything covered so far, it might not be clear how it all ties together. The use of a code repository, task tracker, and document repository all tie together to create a unified and organised workflow.
Taking an example, a team that uses:
Jira for task tracking.
GitHub for the code repository.
Confluence for the document repository.
Bringing all of this together, allows for a workflow that can be monitored and scaled as the team and work grows.
Selecting a Technology Stack for Your Software Project#
In this course, unlike many others, you’re granted the freedom to choose your own technology stack for the web application project. This freedom allows your team to tailor the project to meet specific needs, leverage existing skills, and explore new technologies. However, with great freedom comes the responsibility of making an informed choice that aligns with several critical factors.
Key Considerations for Choosing a Technology Stack#
When selecting a technology stack, consider the following:
Client Preferences: Understand your client’s requirements, preferences, and any existing tech stack they use, as it might influence your choice.
Team Expertise: Assess the knowledge and experience of your team members. Leveraging familiar technologies can accelerate development.
Learning Opportunities: The desire to learn new technologies is commendable, but it needs to be balanced with project timelines and goals.
Resource Constraints: Time and budget limitations are crucial factors. New technologies may require additional learning time or resources.
Components of a Modern Web Framework#
A typical web application’s technology stack consists of the following components:
Frontend Framework: Manages the user interface and experience.
Backend Framework: Handles the server-side logic and interactions.
Web Server: Processes and delivers web requests.
Data Persistence: Stores and manages data.

Popular Choices for Each Component#
Frontend Frameworks#
The frontend is what users interact with. It can be built using basic HTML and CSS, or with dynamic JavaScript frameworks:
Backend Frameworks#
The backend manages the application logic and database interactions. Popular options include:
Language |
Frameworks |
|---|---|
Python |
|
Java |
|
Ruby |
|
PHP |
Databases#
Choose a database that aligns with your data structure and scale requirements:
MySQL: A widely-used relational database.
MongoDB: A document database suited for hierarchical data storage.
PostgreSQL: An advanced open-source relational database.
Web Servers#
Your application will need a web server to handle requests:
Making Your Decision#
Assemble your team to discuss and decide on each component of your technology stack. Consider creating a prototype or a small proof-of-concept project to evaluate how well the chosen technologies integrate and meet your project’s needs.
Additional Resources#
For more insights and comparisons of different technology stacks:
StackShare.io: Offers a comprehensive view of the technologies companies use and community reviews.
Choosing the right technology stack is a foundational step in your project’s success. It influences development efficiency, project quality, and future maintenance. Take the time to research, discuss, and select the best options for your team and project goals.
Architecture#
Software architecture is the fundamental organisation of the system under development. It includes all components, their interactions, the environment in which they operate, and the principles used to design the software.
Once the application’s stack is chosen, it is important to outline the architecture of the system. Detailing the architecture serves the purpose of assuring the client that the development team has thought through the interactions of components and the principles that underpinned their development. It is required information to hand over to the client at the end of semester, so they can continue development.
In this subject, you will be learning the 4+1 architectural model [Kru95].
4+1 Architecture Model#
There are many ways of documenting the architecture of software - the one we will teach is the 4+1 architecture model.
It was originally developed in the 1990s and is used to describe the architecture using several, concurrent views. End-users, developers, system engineers, and project managers all have unique views of the system, hence the viewpoints are used to describe it from their perspectives.
There are five views in the 4+1 view model:

Logical View#
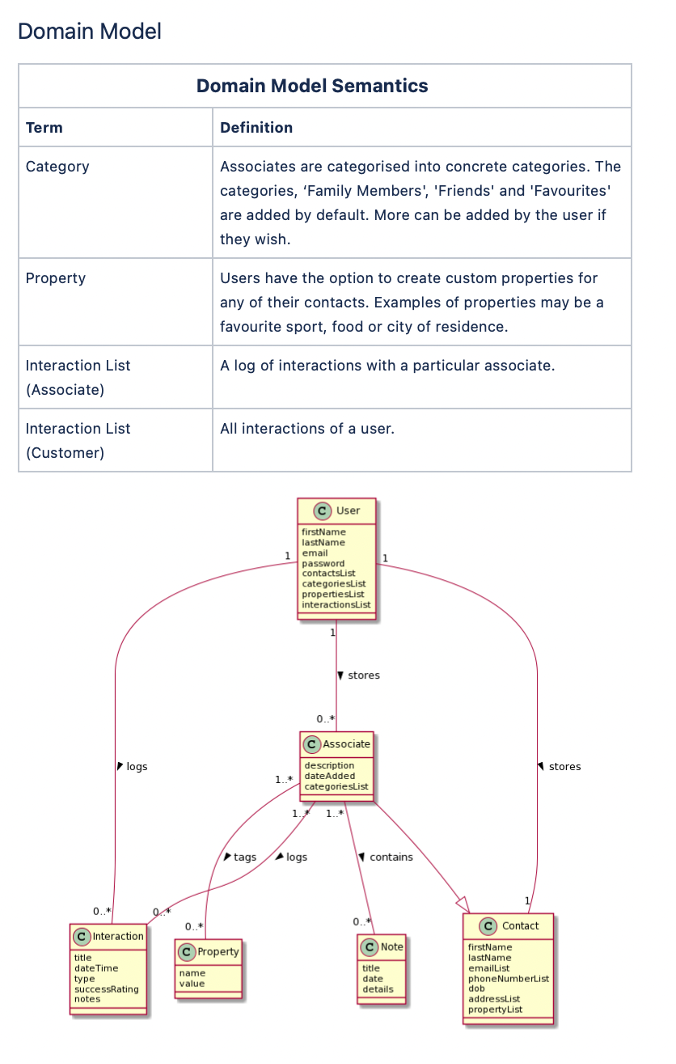
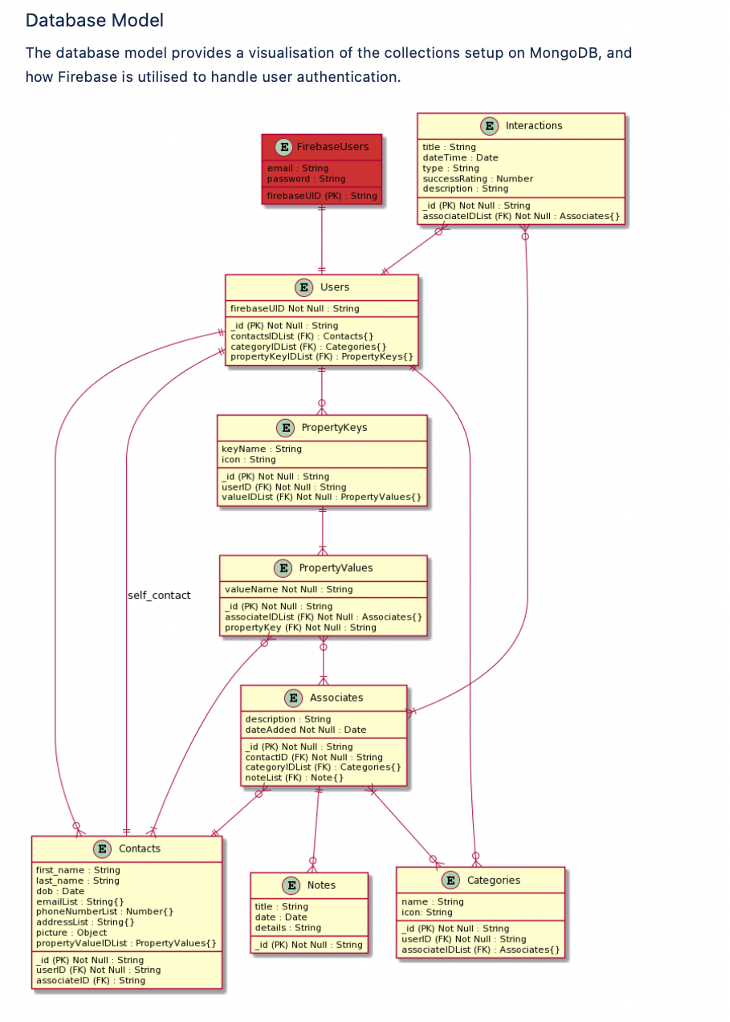
The logical view is concerned with the functionality that the system provides to end-users. Domain and class diagrams are used to represent the logical view.
Examples of diagrams that can be used to support the logical model are domain and database models.
Process View#
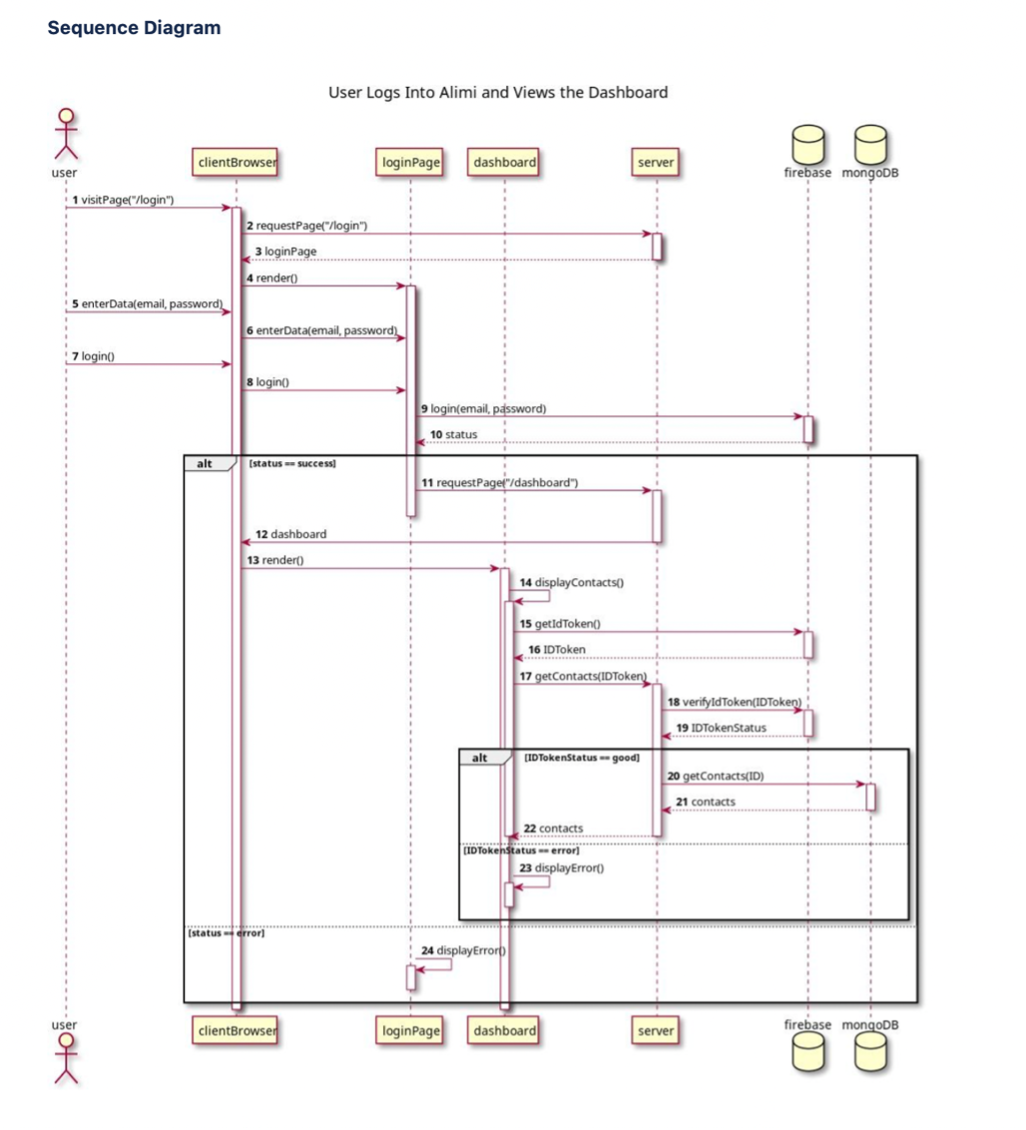
The process view deals with the dynamic aspects of the system, explains the system processes and how they communicate, and focuses on the run time behaviour of the system. Sequence state diagrams are used to represent this view.
Development View#
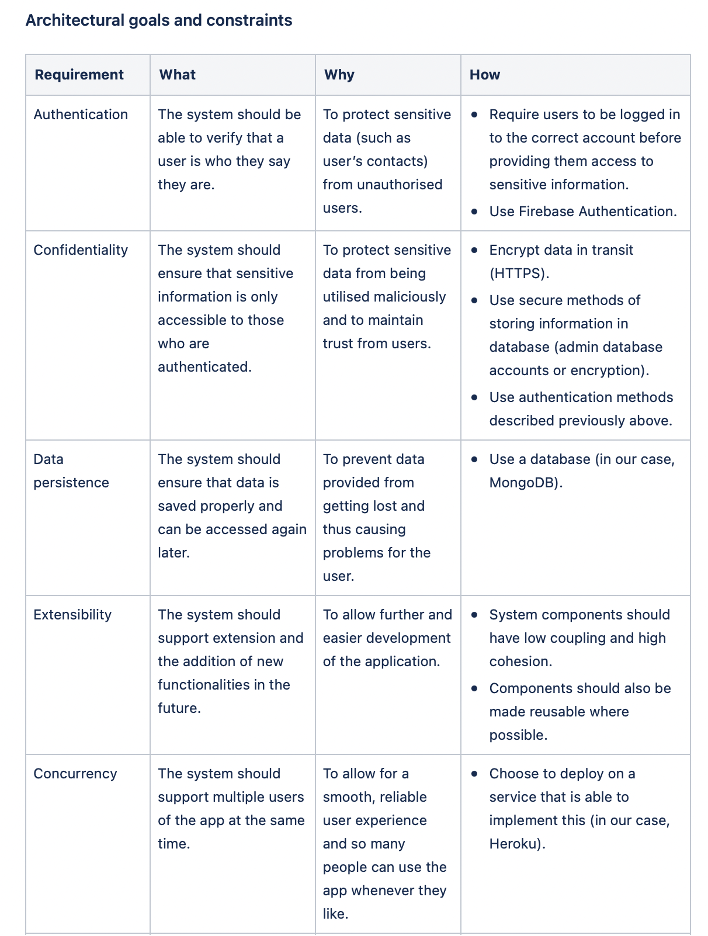
This view is represented by the package diagram and illustrates a system from a programmer’s perspective and is concerned with software management. To demonstrate the development view, your team could describe the architectural goals and constraints, as well as system diagrams, and API descriptions (if any).

Physical View#
The physical view depicts the system from a system engineer’s point of view. It is concerned with the topology of software components on the physical layer, as well as the physical connections between these components, and it represented using the deployment diagram.
Diagrams that can support the physical view are deployment diagrams.


Scenario/Use Case View#
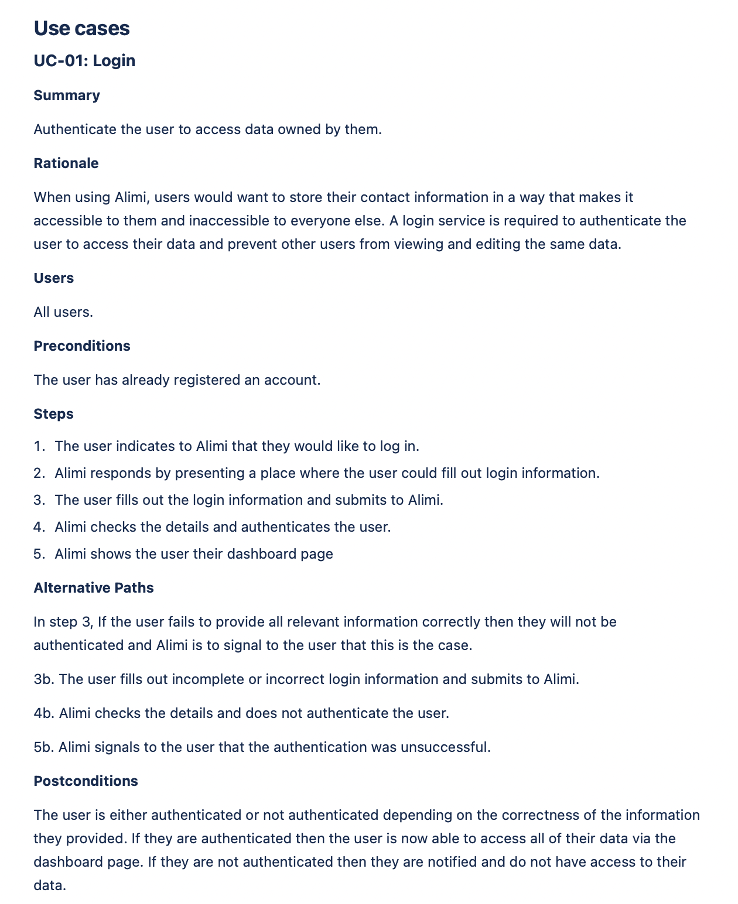
Shows a subset of important use cases and is represented using a use case diagram. Your team should select use case(s) of architectural significance to demonstrate in the use case descriptions and diagrams, as well as a sequence diagrams.
Extra Resources
Link |
Description |
|---|---|
Online Tool for creating architecture, UML, and other diagrams. |
|
Microsoft tool for diagrams, can be downloaded from the uni softwares. |
